

Creation Willi Geller INSTRUCTION


CREATION BY WILLI GELLER
My twenty years of experience as a ceramist became the starting point for the development of Creation and Surprise ceramic powders. It was my dream to be able to offer all those who wanted , as I did , a material that not only afforded the latest technical comfort , but that also supported the need for creative freedom .
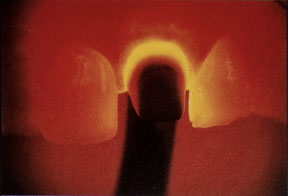
Creation is a material that conveys a living impression ; a ceramic playing with light , absorbing it , scattering it and reflecting it in all colors of the spectrum . It is pulsating iridescent ceramic .
Creation is an iridescent ceramic that conveys an impression of true vitality ; an innovative iridescent ceramic that plays with light to produce a full spectrum of colors . This iridescent effect is the consequence of a balanced composition of high purity used in the materials . The result of this harmonious composition is a brillance of color in a most natural apperance .


The product line of Willi Geller Creation ceramic powders consists of three components : 「Creation Assortment」「 Surprise Assortment」「 Make - up Assortment 」creative possibilities to the ceramist .
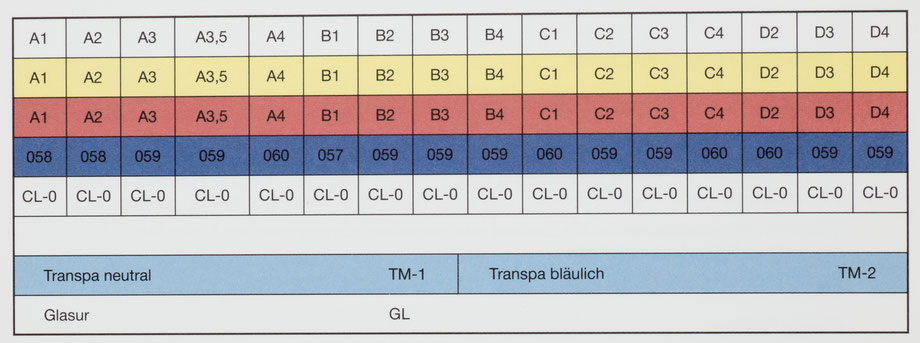
It is easy to understand the concept of Creation , because the assortment is built on a logical scheme . It contains opaque , dentin and enamel powders , shades of which are matched to the Vita -Lumin Shade Guide . It also contains a translucent powder ( CL-O ) , a neutral enamel ( TM - 1 ) , a bluish translucent ( TM - 2 ) and a glaze powder ( GL ) .


Esthetics in the spirit of our time
The esthetic demands of our patients are forever increasing. However , the esthetic result should be inconspicuous. Finally there has been an absolute esthetic solution for the problematic area of the crown margin . This solution is principally due to the development of the unique Surprise shoulder porcelains .The fiber - optic effect , typical for an iridescent ceramic , carries the light through the ceramic shoulder into the gingival area. This creates an inconsqi cuous , natural apperance because of the lighting effect on the gingival tissue .
The lighting effect is also enhanced by the fluorescense of the material. The iridescent ceramic produces the full spectrum of colours shown here in transmitted light , an effect commonly referred to as opales cence


The Creation Assortment offers the ceramist a multitude of creative possibilities . All of the powders can All of the powders can be layered in confidently , because the physical properties Using the Creation powders does not differ very much from usual layering techniques. It is very important , though , to work exclusively with iridescent materials , which are provided in the Surprise Assortment .


The Surprise Assortment is precisely harmonized with the Creation ceramic powders . It is also iridescent and exhibits a unique brillance of colors .
The Surprise Assortment contains opaque modifiers , shoulder procelains , opacelains , opaceous dentins , neck translucent powders , and is complemented with Make - In powders .


The Make - In powders are the incisal effect powders . These far surpass the usual surface stains , which are frequently a subtle balanced intensity at the same time maintaining vitality. Two Make - In powders , Illusion and Crack Liner , deserve particular mention. Laying in Illusion gives the body area more depth . With the help of Crack Liner , the enamel cracks and craze lines can be imitated perfectly .


Our work can hardly be compared to the example set by nature . Neverthe less we need to find a way to direct attention away from the artificial character of our work . We must therefore create contrasts.
The ceramist needs the means to create a style of characterization. The Surprise powders make it possible to target an effective individualization to these characterizations.


Aliving restoration is easily created with the use of the Surprise effect powders. Natural appearing charac terizations such as mamelons , crack lines and abrasion facets as well as enhancing or altering chroma and value are achievable.


If we are speaking of esthetics , we can make major changes in appearance as well as function . The Make - Up Assortment is not suited for great changes , but serves as the subtle cosmetic for retouching . This stain kit contains layering as well as marking colors .

Layering , or painting colors , are to be used lightly as water colors to create soft cover. Marking colors are for intense characterization . They are placed on the surface as found in the natural example .


Opaque

Opaque Application
The opaque powders are specifically harmonized with respect to the shade of the dentin powders . The opaque powder is applied in two layers to achieve maximum bond strength and accurate color replication .
Bonding Layer - First Opaque Application
As the name implies , the first application of opaque powder is to assure maximum bond the ceramic to the alloy . The opaque powder is mixed with the special Opaqued Liquid ( OF ) in a thin consistency , and applied with a brush to achieve a thin , even wash layer . This application is fired under vacuum to a high temperature of 980 ° C . After the high temperature is reached , the vacuum is released and the hold time lasts for one minute in air.
Color Layer - Second Opaque Application
The basic shade of the opaque corresponds to the tooth to be matched and can be individualized using special intense Opaque Modifiers ( OM 11-17 ) . It is stirred to a creamy consistency and applied in a thin , even layer . This application is fired under vacuum to a high temperature of 950 ° C . After the high temperature is reached , the vacuum is released and the hold time lasts for one minute in air.


Porcelain Shoulder

Porcelain Shoulder
The stone die is sealed with a varnish which soaks into the stone, thus leaving negligible film thickness. This varnish seals the stone so the separating medium does not soak in, but remains on the surface. The metal coping fits passively, but without rotation, on the die.
First Shoulder Application
The shoulder porcelain is mixed to a thick consistency with the Shoulder Porcelain Liquid(SPL). The sloulder porcelain is layed on with the coping on the die. Experience suggests that slightly opacified shoulder porcelain should be applied in the area where the metal coping ends. (For example, opaque yellow (SP-28) in the Surprise Assortiment.) This thin layer provides an optically soft passage of light, yet masks the metal edge and the shadowed root.
Next, translucent Shoulder Porcelain (SP 22-26) is placed on and pushed towards the margin. After proper shape is developed it can be dried slightly. When the porvelain first begins to appear white (dry), carefully lift off the coping. The neutral Shoulder Porcelain(SP 21) is used to decrease the chroma of the other shoulder porcelains. The shoulder porcelain is fired under vacuum to a high temperature of 950 °C.
Second Shoulder Application
Clean the die of porcelain particles meticulously, and again apply the separating medium. The coping is placed onto the die and translucent shoulder porcelain is vibrated into the slight gap that exists. The firing cycle is identical to the first shoulder firing.


Opaceous Dentin

Opaceous Dentin
There are cervical indications for the use of opaceous dentin . The most elemental use is to enhance or alter the chroma and value of the restoration . On a pontic or abutment , one can control or stabilize the chroma and value with the use of opaceous dentin if there is excessive space available in the gingival one - third . When it is placed the gingival aspect of pontics it prevents the lowering to the porcelain value capused by the shadowed gingival tissue .
The opaceous dentin layer , applied on the palatal aspect , is carried toward the incisal edge above the height of the metal frame . This controls the translucency and value in the incisal one - third .
Opaceous dentin is highly effective in optically eliminating the opaqued metal frame in thin sections of porcelain , and gives the illusion of depth of color . This is particularly important in masking the metal frame if porcelain margins are not utilized.
Opaceous dentin and neck translucent porcelains glaze slightly higher than the dentin porcelain , even at low firing temperatures . The result is a smooth , glazed surface ideal for maintaining optimum periodontal health .

Dentin

Dentin Layering
The labial side contour of the crown is built up in dentin powder . The incisal length of the dentin should be slightly over - contoured compared to the neighboring teeth . After the proper anatomical contour has been developed , one can cut back the dentin layer in the incisal and the interproximal areas . This allows space for the Make - In porcelain ( incisal effect powder ) and the enamel porcelain .


Alternating beads of enamel , a mixture of 50 % enamel + 50 % translucent , and translucent porcelain should be placed delicately on the incisal edge of the dentin build - up . This will complete the incisal of the build - up.

Inlaying of the Make - In Powders
A smooth transition on the labial aspect is developed between the alternating beads , mentioned above , and the dentin . The surface is therefore prepared for the inlaying of the Make - In porcelain , the incisal effect powder . The Make - In porcelain is mixed with the Universal Liquid ( UF ) . Use of this liquid allows an ideal viscosity to be obtained , and the color of the porcelain is better perceived optically . All imaginable effects that can be foud in the incisal area can be layed in with the Make - In porcelain. Laying Illusion slightly beneath the dentin - enamel transition is particularly effective in creating an impression of greater depth. This unique effect powder is found in the Make - Up Assortment . To imitate mamelons , select the appropriate shade of Make - In porcelain and place it onto the dentin in an incisal - gingival direction . It should be placed slightly incisal to the Illusion layer. Occasionally , to create a more subtle effect , mix the Make - In with the dentin powder before application.


Enamel Layering
The contour of the tooth is completed with the lateral segmental layering of Creation powders . Following the example of a natural tooth , one can work with enamel and translucent porcelains . Begin the lateral segmental layering by placing enamel porcelain on the incisial - proximal area . The poiwder is layed on drop - shaped just as it comes off the brush . Beside the enamel drop , place a drop translucent porcelain . Placed a mixture of 50 % translucent porcelain next to the previous drop . The lateral segmental layering is continued by varying the applied drop shape porcelain . Obviously , there is no absolute order to the succession . It is determined by the translucency desired in particular areas . One can even use a mixture of neck translucent porcelain with the enamel plus translucent mix in particular cases . The Surprise Neck Translucent porcelains ( HT 51 54 ) can be used very effectively in the incisal area . The bluish translucent porcelain ( TM - 2 ) is generelly limited to the proximal areas . It should not be layed internally , or it will lose its effect .


Three Dimensional Enamel Cracks and Crack Lines
Enamel cracks and crack lines are easy to imitate. Rather than placing the porcelain on in a drop shape form during the lateral segmental layering technique, we now place it on in a streak-shaped manner, which creates a vertical wall. A slight amount of Crack Liner, another unique Make-In powder, is applied onto this vertical wall. Continue the lateral segmental layering process carefully, being cautions not to disturb the Crack Liner. Crack Liner is found in the Make-Up Assortment.


Palatal Layering
After the completion of the labial layering, the opaceous dentin layer is applied on the palatal aspect. As mentinoed previously, the opaceous dentin is washed above the metal frame towards the incisal. In an older tooth, one can use a thicker layer of opaceous dentin to reinforce its light-absorbing property. This reduces the light transmitted through the incisal one-third just as it does in an older natural tooth.

Over-laying the opaceous dentin are the body-modifier powders. It is simpy a mixture of dentin porcelain plus Make-Up stain powder. Dentin is then placed on the cingulum area and the marginal ridges. The final layer is made up of enamel and translucent powders (CL-O, TM-2). Towards the gingival one-third is a layer of neck translucent porcelain.

Building of the crown is now almost complete , but one cannot forget serval very important details , as described below .

Proximal Area
One should attempt to imitate the proximal area so that the restoration adjusts to its natural surrounding . The enamel is typically thinner in this area , resulting in increased chroma . A lighter opaceous dentin is best suited for this purpose ( for example OD - 32 ) . This opaceous dentin has yet another , perhaps even more important function . It prevents the shadow from the interproximal to penetrate into the ceramic . It reflects the light , thus maintaining the value of the ceramic . To accomplish this reflection effect , the opaceous dentin must be layed in at a specific angle .

Abrasion Facets
In older teeth one often finds exposed secondary dentin on the incisal edge . To accomplish this effect , a fine probe is used to excavate where the abrasion facet will be . The excavation should between the Make - In layer and the palatal opaceous dentin layer . It should only be filled during the correction firing with a suitable mixture to match the tooth . The build - up of the crown is now finished . The first firning is done under vacuum to a high temperature of 895 ° C .

Incisal Halo
The incisal halo or border is created with a mixture of 50 % enamel and 50 % dentin . Neck translucent porcelain can also be very effective here . The mix is washed delicatelyf onto the incisal edge , framing the translucent layer .

Contouring and Glaze Firing
The aim in contouring is to chieve esthetic harmony with the adjacent tooth. Contouring with diamond burs is necessary to finalize the from, and to incorporate surface texture. If slight additions are necessary, for example to add a proximal contact, mix 15 % glaze powder and 85 % dentin (enamel) with Universal Liquid (UF).
Slight retouching is usually required and desirable before glazing. The Make-Up stains provide translucennt colors (MU/L 71-82) to engage in subtle shading; they behave like water colors.
The unique Make-Up stains (MU/M 91-96) can even be used to create the illusion of stain deposits. These granular marking colors should never used subgingivally for periodontal health reasons.
The glaze firing is done without vacuum and without a hold time at the high temperature of 930 °C.
Final Polish
The surface luster is condidered low because the hold time during the glaze has been eliminated. The advantage of this is to perfectly preserve the surface and the optical effects ot fhe layering of porcelains. The final polish is done with a fine pumice and brass polish mixture. One is able to match the surface luster of the adjacent tooth.


Technical Notes
Alloy Choice
Willi Geller Creation and Surprise ceramic are compatible with a wide variety of alloys. It is recommended for use with alloys having a coefficient of thermal expansion between 13,8 x 10,6 °C and 14,9 x 10,6 °C. Alloys with a high coefficient of thermal expansion should be cooled slowly, at least until 800 °C. This will shift the coefficient value upwards.
There is no greening when used on silver containing alloys.
If gold coats (Deck gold) are used on the alloy, high melting temperatures are recommended (980 °C).
The Ceramic Furnace
To achieve an optimal result when firing Willi Geller Creation and Surprise ceramic, accurate temperatures and rates of rise are necessary. The ceramic should not be under fired nor over sintered.
Generally, each furnace type fires at slightly different temperatures. Therefore, the furnaces should first be calibrated using a silver test at 960 °C. Vertical muffle furnaces are recommended.
There are numerous reasons for differences of temperatures, including:
- type of furnace,
- natural aging of the heating element,
- the use of different firing trays (white trays absorb the warmth therefore lowering the temperature; dark trays store the
warmth and are recommended),
- conduction of heat varies different alloys,
- the altitude above sea level corresponding to the altitude at which the furnace was initially, calibrated.
Rules of Thumb for the Firing
1.) Shake all bottles well before using. Porcelain particles can settle.
2.) The entry temperature is 600 °C.
3.) The opaque and shoulder firings are done with a rise in temperature of 80 °C/min.
4.) The main firings and the glaze firing are done with a rise of temperature from 55 °C to 60 °C/min.
5.) When using vacuum firing, temperature should only be increased after reaching full vacuum.
6.) When using non-precious alloys, it is recommended that the final temperature be raised
approximately 20°C for each cycle.

Post Ceramic Soldering
The smallet practical soldering bock should be used, and the block should be preheated for
30 to 60 minutes at 600 °C. This can be accomplished in a preheating furnace.
The following ceramic furnace cycle should be followef:
Low Temperature: 600 °C
Rate of Temperature Rise: 55 °C/min.
High Temperature: 890 °C
Holding Time: none
Note: The soldering block must be removed immediately from the furnace after the high
temperature is reached and allowed to cool rapidly.
The ceramic is not stressed because the furnace is going through a normal dentin firing.
FIRING CYCLES


