

Creation Willi Geller Workbook - 1


METAL FRAMEWORK

The metal framework should be ground
with tungsten carbide cutters or fine - grained ,
ceramic bonded stones ensuring that the rotary
instrument is always moved in the same
direction . Make quite certain that no parts of
the metal become overlapped during trimming .

The framework should be sandblasted with aluminium oxide
( precious metal - 110 my , non - precious metal -
250 my , at a pressure of 2-3 bars ) and then
steam - cleaned or cleaned and degreased .

Oxidize the framework according to the manufacturer's instructions .
Ensure that the oxide layer is uniform .

1st OPAQUER FIRING

Use the ”Creapast” Brush to apply the ”Creapust"
to the metal framework, ensuring that the
brushstrokes are even and that the metal is
masked by approximately 75%. Make certain
that the brush is only very slightly moist.

The first firing is carried out at 980 °C (non-precious alloys: 1000 °C),
in vacuum. Once the final temperature
has been attained, the firing chamber is vented.
Hold-time: 1 minute.
It is absolutely essential to pre-dry the
framework for 6 minutes at 550 °C.

After firing, the opaquer should have a slight sheen.

2nd OPAQUER FIRING

The second coating of opaquer should mask the metal completely .
If necessary , the opaquer shade can be adjusted
slightly with special opaquer modifiers .
( Opaquer powder from the "Creation"
Assortment may also be used for the second
opaquer coating ) .

The second opaquer firing is carried out at 950 ° C , in vacuum .
Once the final temperature has been attained ,
the firing chamber is vented once again .
Hold - time : 1 minute .
It is absolutely essential to pre - dry the
framework for 6 minutes at 550 ° C .

After the second firing , the opaquer should have an egg - shell finish .
Technical tips :
• The Creapust Brush must only be moistened slightly for use !
• Never dilute Creapast with water !
• The consistency of Creapust can only be adjusted slightly with UNIVERSAL FLUID ( UF ) from the Suprise Assortment !
• Avoid drying the material too quickly prior to and after placing it in the firing chamber ( bubbles due to boiling ) !
• Extruded material must not be drawn up into the syringe again !
• It is essential to pre - dry for 6 minutes at 550 ° C ( except when using an Ivoclar P90 = 400 ° C ) !

APPLYING THE OPACIOUS DENTINE

Seal the surface of the alveolar ridge beneath the pontics
using cyanoacrylate or lacquer and then apply
the separating agent with a" Crea - Pen"
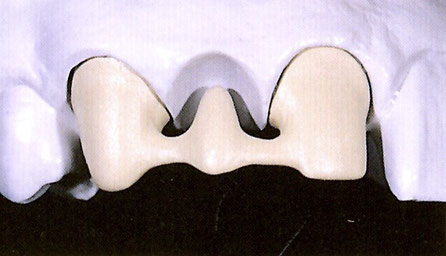

The opacious dentine conceals the thin marginal area of the crown
and prevents excessive shadow effect penetrating the porcelain , including the interdental spaces .Opacious dentine also vitrifies to a slightly higher degree , thus making it more homogeneous and hygienic from the periodontal point of view .This is also very significant as far as the underside of the pontic is concerned and , in addition , stabil izes the shade of the cervical third of the crown .
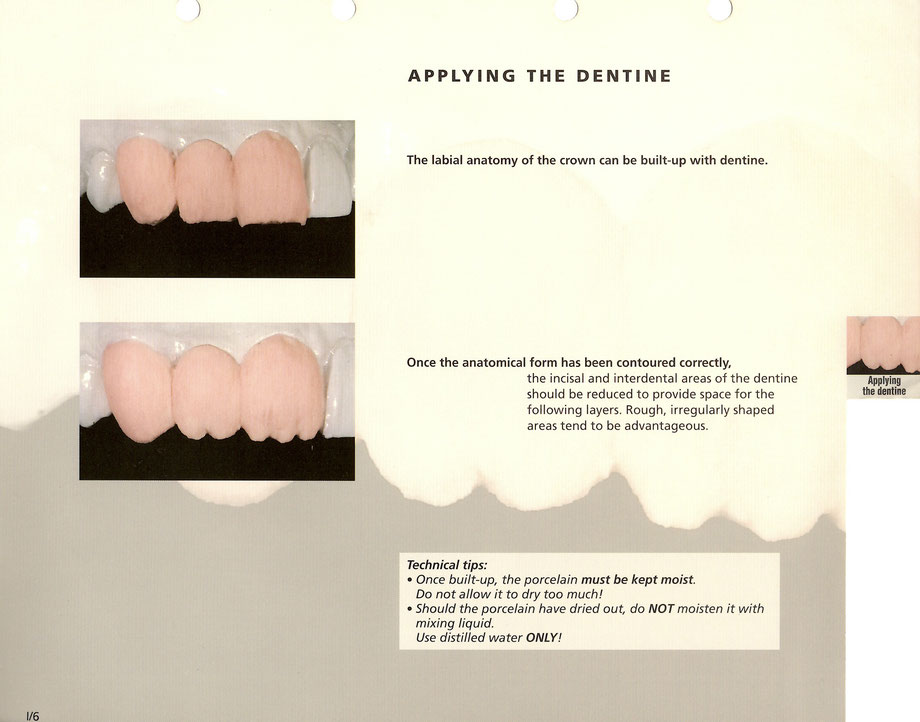
APPLYING THE DENTINE

The labial anatomy of the crown can be built - up with dentine .

Once the anatomical form has been contoured correctly ,
the incisal and interdental areas of the dentine
should be reduced to provide space for the
following layers . Rough , irregularly shaped
areas tend to be advantageous .
Technical tips :
• Once built - up , the porcelain must be kept moist .
Do not allow it to dry too much !
• Should the porcelain have dried out , do NOT moisten it with
mixing liquid .
Use distilled water ONLY !

APPLYING THE INCISAL PORCELAIN

The incisal aspect of the dentine layer is then extended vertically
with incisal and transparent porcelains and
contoured as required . The porcelain should
not be condensed whilst being built - up .
The dentine , in comparison to the adjacent
teeth , should be slightly over - extended
vertically .

Once the restoration has been released from the model ,
the contact areas are built - up with the
appropriate dentine , opacious dentine
and incisal porcelains and the interdental
spaces separated with a sharp instrument
( razor blade , thin scalpel etc. ) .

The first dentine firing is carried out at 920 ° C , in vacuum .
Once the final temperature has been attained ,
the firing chamber is vented .
Hold - time : 1 minute .
The only reliable method of ascertaining
whether the porcelain has been fired properly
is to view it after firing . If it appears like the
illustration opposite ( slightly glazed ) , the firing
cycle was correct .

2nd DENTINE FIRING

The bridge should be trimmed and cleaned
before adding further porcelain .
The 2nd dentine firing is intended for adjusting
the form of the bridge units only . Only small
adjustments are made to the form .

This firing is carried out at 910 ° C , in vacuum .
Once the final temperature has been attained ,
the firing chamber is vented once again .
Hold - time : 1 minute . If the porcelain has been
fired properly , it will also appear slightly glazed
after this firing .
Usually , only minimal adjustments have to be made to the form .
It is important that the surface morphology of
the restoration appears natural . It should
harmonize aesthetically with the adjacent
teeth , which can be achieved with standard
tungsten carbide cutters .

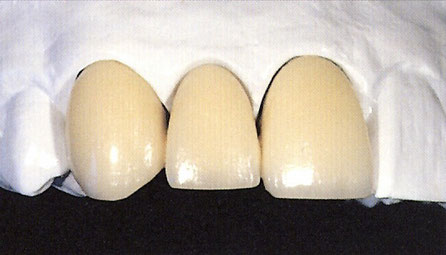
GLAZING

Once the bridge has been trimmed and cleaned ,
special effects can be added using the stains which are applied like water colours .
These stains are matched to one another
accurately and can be used to apply effects such as interdental or apical discolouration .
Glazing is carried out at 930 ° C , in air and with no hold - time .

This porcelain tends to exhibit a slight sheen only ,
which adds to its vitality .
The glaze of the restoration can also be matched to that in the mouth by polishing it with pumice and Sidol .

" Creation" restorations reproduce shades absolutely accurately
and create a brilliant , iridescent effect even
though they are easily built - up .


Creation -porcelains also exhibit exactly the right degree
of fluorescency which , even under extreme lighting conditions , enables the restoration to blend absolutely naturally and harmoniously with the residual dentition .

For further details , please refer to the
"Creation" - firing chart and shade determination chart .


FIRING INSTRUCTIONS
Preheat temp.. Drying time
Raise of temp. Vakuum
Final temp. Holding time
Appearance
OXIDATION
refer to the alloy manufacturer's instructions
1st OPAQUER FIRING
Creapast *
Pulver-Powder opaquer
550°C.. 6min
600°C.. 6min
80°C/min. .... ..yes
80°C/min. .... ..yes
980°C.. .1min
980°C.. .1min
slight shining
2nd OPAQUER FIRING
Creapast *
Pulver-Powder opaquer
550°C.. 6min
600°C.. 2min
80°C/min. .... ..yes
80°C/min. .... ..yes
950°C .. .1min
950°C .. .1min
Egg-shell shining
1st AND 2nd
SHOULDER FIRING
600°C.. 2min
80°C/min. .... ..yes
950°C.. .1min
slight shining
1st DENTINE FIRING
580°C.. 6min
55°C/min. .... ..yes
920°C.. .1min
slight shining
2nd DENTINE FIRING
580°C.. 4min
55°C/min. .... ..yes
920°C.. .1min
slight shining
GLAZE FIRING
600°C.. 2min
55°C/min. .... ..ー
930°C .. .ー
shining
POST SOLDERING
(Lot 800 °C)
600°C.. 2min
55°C/min. .... ..ー
850°C .. .ー
* when firing onto non-precious alloy: final temperature 1000 °C
* Ivoclar Programat P90/P95: 400 °C Preheating temp. Creapast
• The soldering investment should be as small as possible. Dry it in a preheating furnace for 10-20 min. at 200 °C. Then transfer the model to the porcelain furnace.
Once the soldering cycle has been completed, the soldered restoration must be removed from the furnace immediately. It is important that the restoration be cooled rapidly
after soldering!
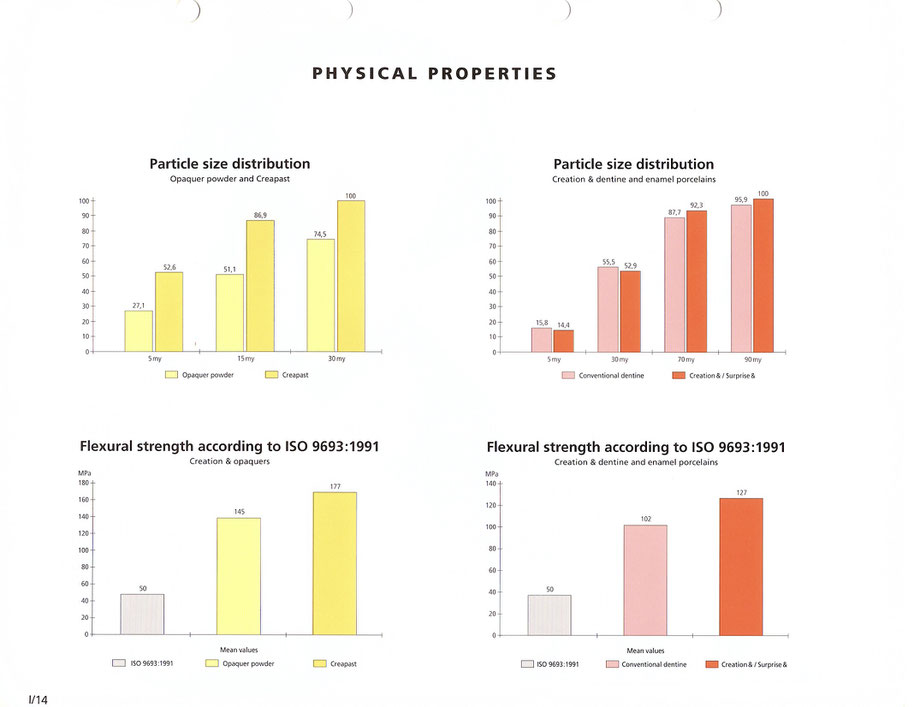
PHYSICAL PROPERTIES
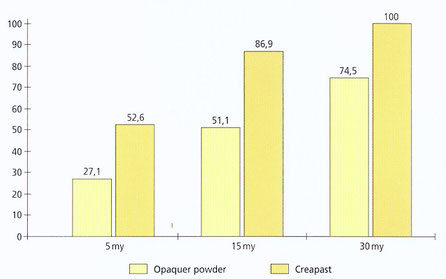
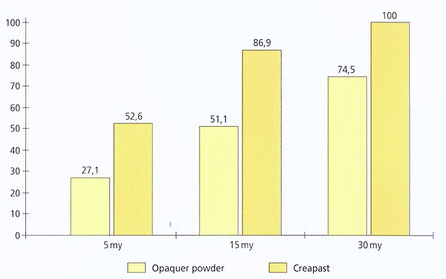
Particle size distribution
opaquer powder and creapast
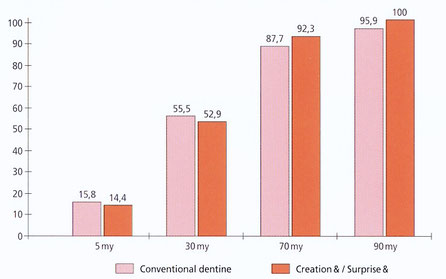
Particle size distribution
Creation & dentine and enamel porcelains
Flexural strength according to ISO 9693:1991
Creation & opaquers
Flexural strength according to ISO 9693:1991
Creation & dentine and enamel porcelains


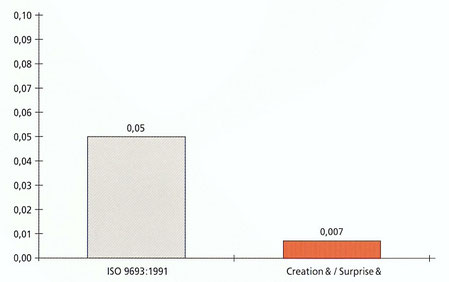
Solubility according to ISO 9693:1991
Creation & dentin and enamel porcelains
Bond strength according to ISO 9693:1991

All Klema products are of the highest possible quality and provide maximum reliability for the dentist , laboratory and patient .
ISO 9001 is an internationally recognized quality assurance system .
